Some latent prints go unrecovered not because the ridge detail is gone, but because the tools used to enhance the image could not separate it from the background. That is a solvable problem.
Background color, surface texture, and pattern interference compete with the ridge detail you need to see. Traditional grayscale enhancement helps, but not always enough. When the background and the print share similar tonal values, converting to black and white blends them together. You lose the very detail you were trying to isolate.
That is why color channel analysis has become one of the important tools in a latent print examiner’s kit. And it is why the right latent print software is changing what examiners can actually recover.
The Problem With Color in Forensic Imaging
A color photograph is made of three channels: red, green, and blue. Each pixel is a mix of those three values. Together, they create the full-color image your eye sees.
The problem? When you enhance the full image, you enhance everything equally. The print and the background move together. If a print sits on a red surface and you adjust brightness and contrast, the red background moves with you. You gain little separation.
Grayscale conversion makes it worse. When software averages the three channels into a single gray value, a red background and a light-toned print can land at the same level. They become indistinguishable. The ridge detail is still in the image. You just cannot see it.
Color channel analysis offers a way out.
What Color Channel Analysis Actually Does
Instead of treating the image as one picture, channel analysis lets you examine each channel individually: red, green, and blue.
What you find is often surprising.
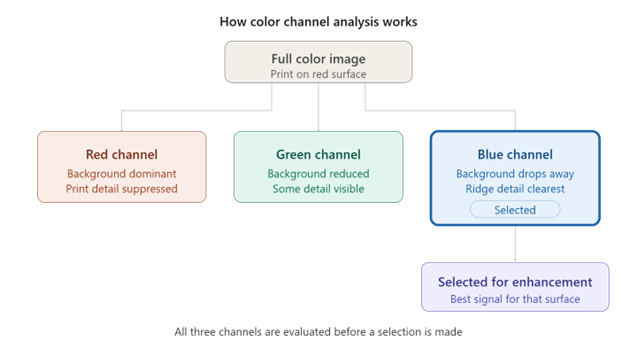
A print on a red surface will appear washed out in the red channel. The background is heavily represented there. But in the green or blue channel, that background drops away. The print detail that disappeared in the combined image suddenly has contrast. Ridge structure that was invisible in grayscale becomes visible because the channel you are viewing does not carry the same background noise.
This is not a trick. You are not creating information that was not there. You are finding the channel where the signal is clearest for that specific surface.
The evidence was already there. The right channel reveals it.
Different surfaces respond differently. A print on blue packaging may stand out in the red channel. A print on green fabric may be clearest in blue. There is no universal rule. The examiner looks at each channel, finds the one with the most ridge detail, and works from there. For a deeper look at how this technique applies in practice, see our Color Channel Analysis for Latent Print Enhancement: A Practical Guide.
Why This Matters for Challenging Substrates
Examiners encounter difficult surfaces regularly. Evidence does not arrive on clean white paper. It arrives on:
- Colorful product packaging
- Patterned clothing and fabric
- Multicolored vehicle interiors
- Tinted plastics and foils
- Evidence collection bags and envelopes
On these surfaces, standard enhancement often falls short. The ridge detail may exist in the original image, but the visual noise buries it. Without channel-level tools, examiners face a hard choice: submit a low-quality image or document the print as unworkable.
Channel analysis changes that. By isolating the channel with the best contrast for a given surface, examiners can often recover ridge structure that standard enhancement misses. A print that looked unworkable in the full-color photograph becomes a viable comparison candidate in the blue channel.
That is a meaningful difference in case outcomes.
How This Works Inside Digital Forensic Suite
VeriPic’s Digital Forensic Suite™ includes a dedicated channels tool. Examiners can isolate the red, green, or blue channel and evaluate each one independently, all inside the same secure, non-destructive environment used for other enhancement tasks.
The original file is unchanged. When an examiner opens an image in Digital Forensic Suite and saves an adjusted version, the audit trail captures that, logging that the file was opened, worked, and saved. That record supports chain of custody without requiring manual documentation from the examiner.
Channel work also sits alongside other tools in the suite: FFT filtering, brightness and contrast, curves, and the invert function. That means an examiner can isolate a channel and apply additional enhancements in the same session. The full workflow stays in one place.
No exports. No re-importing. No workarounds.
The Evidentiary Case for Channel Work
Some examiners worry that aggressive enhancement weakens their position in court. That concern makes sense. If opposing counsel can argue the examiner altered the print, the analysis is at risk.
Color channel analysis does not alter the print. It removes interference that was hiding it.
Selecting the blue channel to reduce red background noise does not change the ridge detail. The ridge structure visible in that channel already existed in the original photograph. The channel view makes it legible.
That distinction matters in testimony. An examiner who can explain clearly what a color channel is and why they chose it is in a strong position. The enhancement is reproducible. The rationale is straightforward. For more on why reproducibility is central to forensic credibility, see Why Consistency Is the Cornerstone of Forensic Image Analysis.
Software that supports this workflow and logs it automatically makes that testimony easier to deliver and harder to challenge.
What Channel Analysis Makes Possible
Channel analysis gives examiners a viable path on surfaces that standard enhancement cannot handle. That includes packaging, tinted plastics, and multicolored substrates where grayscale conversion produces a flat, unusable image.
The detail was in the original photograph. Standard enhancement could not surface it. Channel analysis can. NIST IR 8215 found that digital preprocessing can transform latent images with little or no evidentiary value into ones suitable for identification, and specifically identifies editing individual color channels to suppress colored backgrounds as an available examiner technique.
In some cases, the difference between a workable print and an unworkable one is simply the right channel. In a case where a latent print is the only physical evidence connecting a suspect to a scene, that is not a minor workflow improvement. It can be the difference between a prosecution and a dead end.
The Right Tool for the Work
Latent print examiners do not need more software. They need better software, tools built around the specific demands of forensic image analysis and the evidentiary standards that govern it.
Color channel analysis is technically sound, forensically defensible, and effective on the surfaces that cause the most trouble. The evidence is already in the photograph. The channel view makes it visible.
Digital Forensic Suite gives examiners access to channel analysis within the same non-destructive environment they use for other enhancement tasks. One system. Built for the work.
If your team is still treating multicolored substrates as unworkable, the problem may not be the print. It may be the tools.
For a broader look at how digital forensics software supports the full latent print workflow, see The Complete Guide to Digital Forensics Software for Law Enforcement.